What Is Flexographic Printing, and When Should You Use It for Packaging?
Need to print on materials like poly mailers or corrugated boxes? You find that standard printing methods are too expensive or just don't work, leaving your brand with a smudged, unprofessional look.
Flexographic printing1, or "flexo," is a rotary printing process that uses flexible photopolymer plates2 and fast-drying inks3. It is the go-to method for printing on a wide variety of materials, especially non-porous surfaces4 like plastics, films, and corrugated cardboard5, making it perfect for labels, shipping boxes, and flexible packaging.

The first time I saw a modern flexo press in action, I was stunned. It was for a huge order of custom-branded packing tape for an electronics client. The machine was printing thousands of feet per minute. That experience taught me a valuable lesson: for certain applications, especially those involving flexible materials or massive volumes, flexography isn't just an option—it's the only logical choice. Let me explain why.
How Does Flexographic Printing Actually Work?
You've heard flexography compared to a rubber stamp, but you know it's more complex than that. Without understanding the mechanics, you can't tell why it's the right choice for certain jobs.
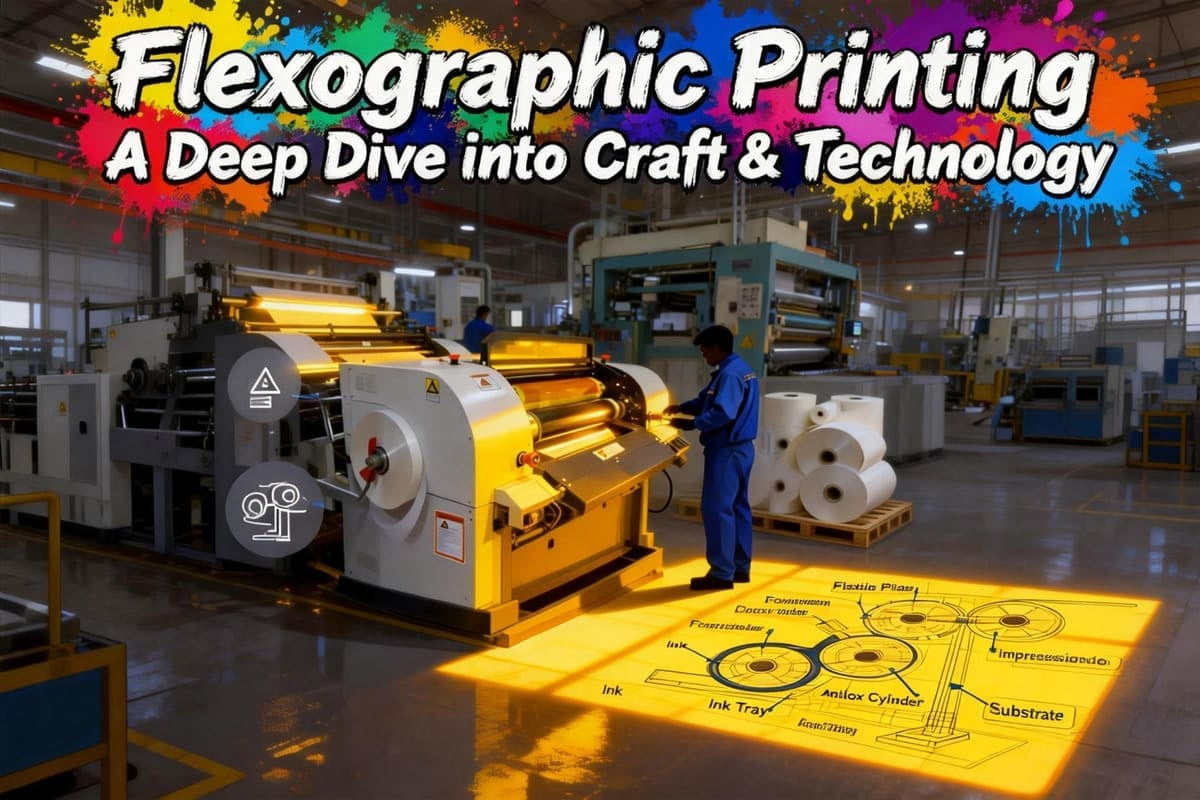
Flexography works by using a flexible printing plate wrapped around a cylinder. A special roller, called an anilox roller6, transfers a precise, uniform layer of fast-drying ink to the plate. The plate then rotates and prints the image directly onto the packaging material.

The real secret to modern flexo quality is the anilox roller. It’s what changed flexo from a simple stamping process to a highly controlled printing method. I once had a client who was getting inconsistent color density7 on their printed poly mailers. The issue wasn't the ink or the plate. I checked the factory's specs and found they were using an anilox roller with too low a line screen for the design's fine details. It was laying down too much ink. We had them switch to a higher LPI (Lines Per Inch)8 anilox roller, and the problem was solved almost instantly. Controlling that roller is controlling the print quality.
The Key Components of a Flexo Press Unit
| Component | Role | Why It Matters for Quality |
|---|---|---|
| Anilox Roller | A laser-engraved ceramic roller with tiny cells that hold and transfer a precise volume of ink. | This is the heart of the press. The cell volume dictates the ink thickness and color consistency. |
| Doctor Blade | A thin blade that scrapes excess ink off the anilox roller, leaving ink only in the cells. | Ensures that the precise, intended amount of ink is transferred to the plate. No more, no less. |
| Plate Cylinder | The cylinder that holds the flexible photopolymer printing plate. | Rotates at high speed to transfer the image from the plate to the packaging material. |
| Impression Cylinder | The cylinder that presses the material against the printing plate. | Ensures a clean and complete transfer of the ink from the plate to the substrate. |
When Is Flexo a Better Choice Than Offset Printing?
You know offset printing9 provides premium quality, but it's not always the right tool. Choosing the wrong process can lead to a failed project or unnecessary costs, and you're unsure when to use flexo instead.
Choose flexography for printing on non-porous surfaces like plastic films, foils, and labels. It is also the most cost-effective method for printing simple graphics and logos directly onto corrugated cardboard shipping boxes in very large quantities.

This is one of the most common questions from designers like Jacky. A client will want the photo-realistic quality of offset on a poly mailer bag, and I have to guide them toward flexo. Offset printing uses oil-based, slow-drying inks that need to absorb into a paper surface. Flexo uses fast-drying liquid inks that are designed to adhere to the surface of non-absorbent materials. It is all about matching the ink and printing method to the substrate. Trying to use offset on a plastic bag is like trying to paint a car with watercolor—it just won't stick.
Flexo vs. Offset: A Quick Guide
| Feature | Flexographic Printing | Offset Printing |
|---|---|---|
| Best Materials | Plastics, foils, labels, corrugated board, paper bags, tape. | Paperboard (folding cartons), rigid box wraps, commercial paper. |
| Image Quality | Good to excellent. Best for solid colors and bold graphics. | Excellent to photographic. Best for fine detail and gradients. |
| Ink Type | Fast-drying liquid inks (water-based, solvent-based, UV-curable). | Slow-drying paste inks (oil-based). |
| Plate Cost | Moderate. Plates are durable and last for millions of impressions. | High initial cost. Plates are less durable than flexo plates. |
| Best Use Case | High-volume shipping boxes, food packaging, labels-on-a-roll. | Premium retail cartons, luxury boxes, brochures, and magazines. |
What Design Adjustments Are Needed for Flexographic Printing?
You've sent a beautiful design to a flexo printer, only to be told it needs major changes. This is frustrating and can cause delays if you don't know how to design for the process from the start.
For flexo printing, you must simplify designs. Use vector graphics%%%FOOTNOTE_REF10%%%, avoid tiny text and reverse-outs, and build in "[trapping](https://en.wikipedia.org/wiki/Trap(printing))11" to compensate for slight plate misalignments. High-resolution photos and smooth gradients are very difficult to reproduce perfectly.

I've seen beautiful, intricate designs fail on a flexo press. The most common issue I run into is something called "dot gain12." Because the flexo plate is soft and presses directly onto the material, the ink dots tend to spread out slightly as they are applied. This can make images look darker and can cause small text or fine lines to fill in and become blurry. A good designer knows this and plans for it. They will use slightly thinner lines and larger text than they think they need, knowing the dot gain will "thicken" it on the final print. It's a key part of designing successfully for flexography.
My Flexo Design Checklist
- Keep It Simple: Flexo excels with bold logos, text, and solid color blocks. Avoid complex, multi-layered images where possible.
- Use Vector Artwork: Always create your core design elements in a vector-based program like Adobe Illustrator. This ensures the sharpest possible lines.
- Specify Pantone Colors: For brand colors, use Pantone (PMS) spot colors instead of CMYK whenever possible. It provides far better consistency.
- Avoid Small Text: Text below 6pt, especially if it's "reversed out" (light text on a dark background), is likely to fill in and become unreadable.
- Incorporate Trapping: Talk to your printer about trapping. This means slightly overlapping adjacent colors in the design file to prevent ugly white gaps if the plates misalign even slightly during the high-speed run.
Conclusion
Flexographic printing is the workhorse of the packaging industry13. It is the best choice for printing on flexible materials and corrugated board, offering unmatched speed, durability, and cost-effectiveness at high volumes.
Explore this resource to understand the fundamentals of flexographic printing and its applications in packaging. ↩
Learn about the role of flexible photopolymer plates in flexographic printing and their advantages. ↩
Discover the benefits of fast-drying inks in printing processes, especially in flexography. ↩
Find out why non-porous surfaces are ideal for flexographic printing and their common uses. ↩
Discover the advantages of corrugated cardboard for packaging and its compatibility with flexo printing. ↩
Understand the importance of the anilox roller in flexographic printing and its impact on quality. ↩
Explore how color density influences the final print quality and consistency in flexographic printing. ↩
Learn about LPI and its significance in achieving high-quality prints in flexography. ↩
Compare flexographic and offset printing to determine which method suits your project best. ↩
Understand the significance of vector graphics in achieving high-quality prints in flexography. ↩
Find out why trapping is essential in flexographic printing to avoid misalignment issues. ↩
Explore the concept of dot gain and its implications for design adjustments in flexographic printing. ↩
Explore the significance of flexographic printing in the packaging industry and its advantages. ↩