How Are Plastic Packaging Bags Manufactured for International Buyers?
You need to source custom plastic bags, but the manufacturing process seems like a black box. You worry about poor quality, missed deadlines, and inconsistent results from overseas suppliers.
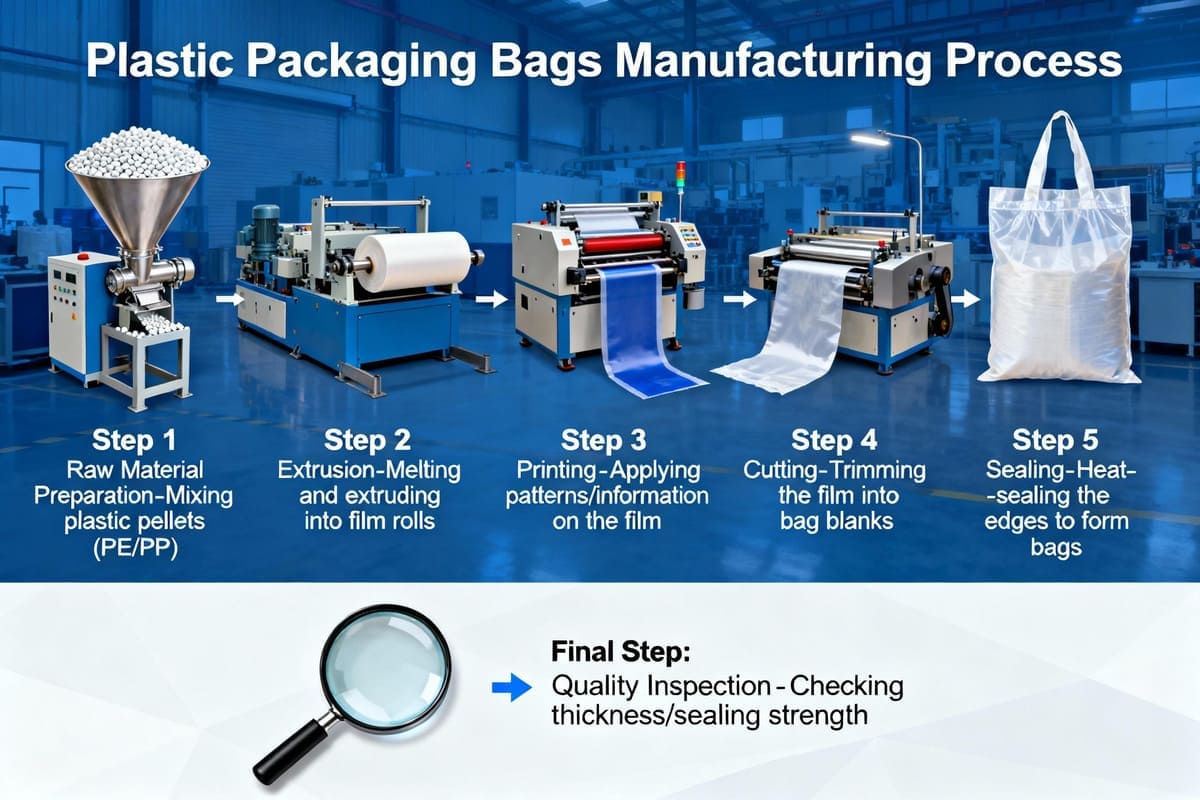
Plastic bags1 are made through a multi-step process2: blowing raw resin3 into film, printing designs, often laminating4 layers for barrier properties, and finally, cutting and sealing. Each stage requires strict quality control5 to meet international standards.

I remember my first time walking through a large-scale bag factory. I had been in the business for a while, but only on the sales side. Seeing the process from start to finish was a game-changer. I watched tiny plastic pellets transform into a massive, ceiling-high bubble of film, then race through a printing press at incredible speed. It was noisy, complex, and surprisingly precise. I saw how a ten-degree temperature change in the extruder or a one-millimeter misalignment on the printer could ruin thousands of bags in minutes. That day, I realized that for a buyer, understanding this process isn't just a technical curiosity. It's the key to asking the right questions, identifying a good supplier, and preventing costly mistakes before they ever happen.
What Happens During the Film Blowing (Extrusion) Stage?
You worry your bags won't be strong enough or will have inconsistent thickness. An error at this very first step could compromise your entire product's integrity and protection.
In film blowing6, plastic resin pellets7 are melted and extruded into a thin tube of film called a "bubble." The size, cooling rate, and stretching of this bubble determine the finished film's thickness, strength, and clarity.

This initial stage is the foundation of your entire bag. If the film is flawed, nothing you do later—printing, sealing—can fix it. As a designer like Jacky, knowing the basics helps you specify exactly what you need. First, the right raw material, or resin, is chosen. Then, it's melted down and forced through a circular die. Air is blown into the middle, inflating the molten plastic into a continuous "bubble" that travels upwards, often two or three stories high. As it rises, it cools and solidifies. The speed of the rollers pulling the film and the amount of air inside the bubble are carefully controlled to achieve the precise thickness needed. Any inconsistency here can create weak spots or thin patches in the film, which is why a supplier's quality control at this stage is so critical.
| Resin Type | Key Property | Common Use for Bags |
|---|---|---|
| LDPE | Flexibility, Clarity | Bread bags, produce bags |
| HDPE | Strength, Stiffness | Grocery bags, trash liners |
| PP | High Clarity, Stiff | Snack bags, candy wrappers (often laminated) |
How Are My Brand's Designs Printed on Plastic Film?
Your brand has a beautiful, multi-color design. You're afraid an overseas supplier will mess up the colors or alignment, making your high-quality product look cheap and unprofessional on the shelf.
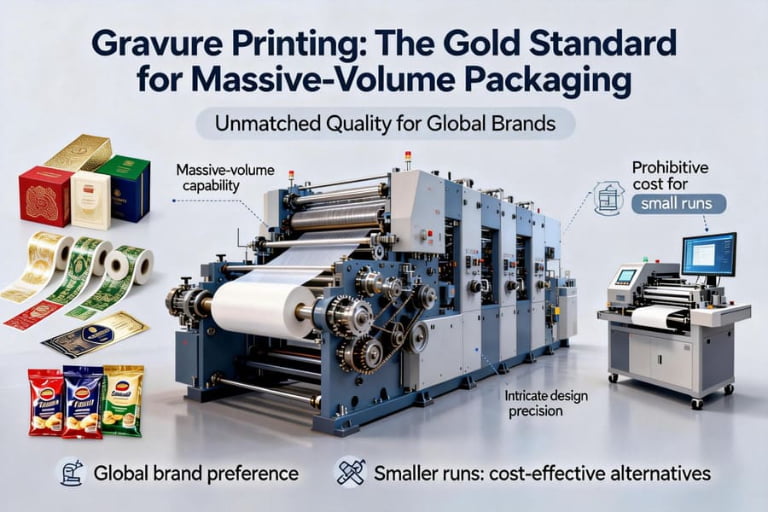
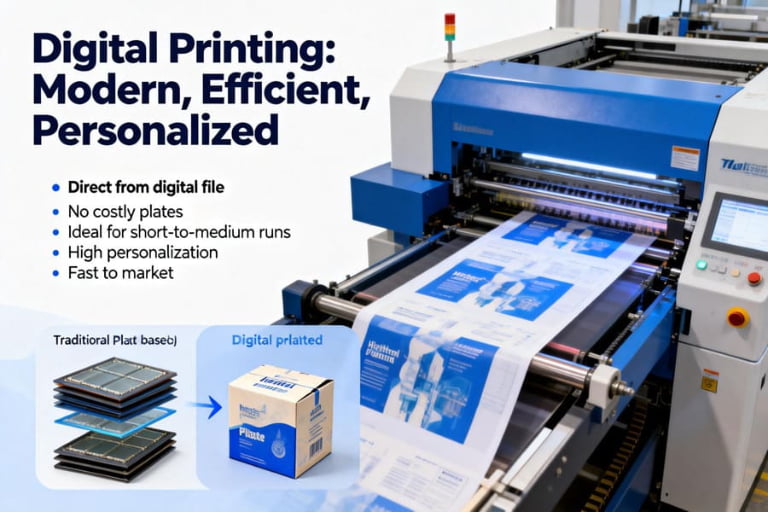
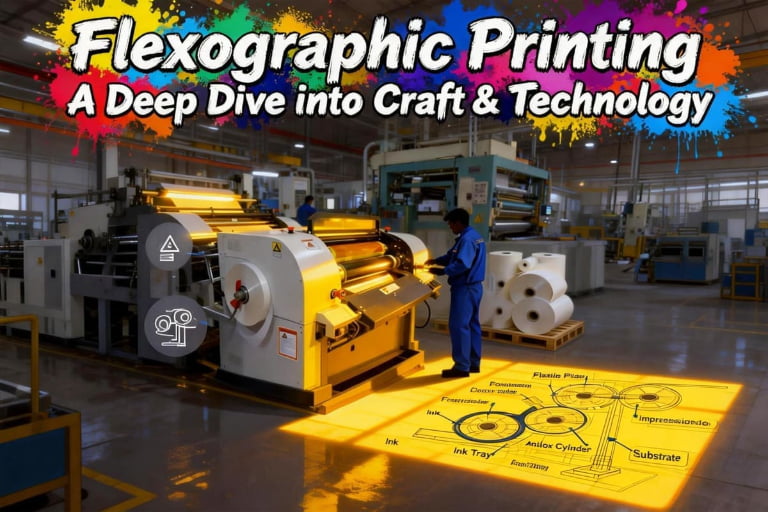
Designs are printed using either Flexography8 (Flexo) or Rotogravure9 (Gravure). Flexo uses flexible plates and is best for simpler designs, while Gravure uses engraved metal cylinders for superior, photo-quality printing on high-volume orders.

Choosing the right printing method is a crucial decision that impacts cost, quality, and lead time. This is a conversation I have with almost every new client. Think of Flexography as a highly advanced rubber-stamping system. It's versatile and the setup cost for the flexible printing plates is relatively low, making it ideal for smaller runs or less complex designs with solid colors. Rotogravure, on the other hand, is the gold standard for high-end packaging. The design is chemically etched into massive copper-plated steel cylinders. The setup cost is very high because creating these cylinders is expensive and time-consuming. However, for massive print runs (hundreds of thousands of bags), the quality is unmatched and the per-unit cost becomes very low. It produces stunning, photo-realistic images that make a product stand out.
| Feature | Flexography (Flexo) | Rotogravure (Gravure) |
|---|---|---|
| Print Quality | Good, best for solid colors/text | Excellent, photo-realistic |
| Setup Cost | Low (flexible printing plates) | High (engraved metal cylinders) |
| Best For | Short-to-medium runs, simpler designs | Long runs (100,000+), complex art |
| Lead Time | Shorter | Longer (due to cylinder engraving) |
Why Do So Many Food Bags Need a 'Laminating' Step?
You need a bag for coffee or chips. You know a simple plastic bag won't work, but the concept of "laminating" seems like an extra, expensive step you don't fully understand.
Laminating is the process of bonding multiple layers of different materials together. This creates a single film with combined properties, like an oxygen barrier10 from one layer and sealing strength from another, which is essential for preserving food.

A single layer of plastic can rarely do everything you need it to do. Laminating is how we create high-performance packaging11. Think of a potato chip bag. It needs to look good on the outside, keep oxygen and light out to prevent the chips from getting stale and rancid, and be easy to seal. No single material can do all that. So, we laminate.
A Typical 3-Layer Structure
- Outer Layer (PET - Polyethylene terephthalate): This is the printing layer. It’s chosen for its high clarity, stiffness, and excellent printability. Your beautiful branding goes here.
- Middle Layer (AL - Aluminum Foil or VMPET - Metallized PET): This is the barrier layer. It’s a workhorse that blocks nearly 100% of oxygen, moisture, and UV light, which are the enemies of freshness.
- Inner Layer (PE - Polyethylene): This is the food-contact and sealing layer. It’s chosen because it’s food-safe, inert, and melts at a lower temperature, which allows factories to heat-seal the bag shut without melting the other layers.
Using an adhesive, these three layers are fused together into a single, high-performance film that protects the product inside and communicates brand quality on the outside.
How Do All These Steps Come Together to Make the Final Bag?
You've learned about film, printing, and laminating. But how does this wide roll of material actually turn into the thousands of individual bags you need for your product?
The finished, printed roll of film is put on a bag-making machine12. This machine rapidly cuts the film to the correct size, heat-seals13 the sides and/or bottom, and adds features like zippers or tear notches.

This final conversion stage is where the magic of automation takes over. It’s a fast and highly precise process. The large roll of laminated film, which can be hundreds of meters long, is fed into the bag-making machine. Optical sensors read registration marks14 printed on the film to ensure every bag is cut in exactly the right place, so your design is perfectly centered. Then, heated bars press down on the film to create the side seals and bottom seal, fusing the inner PE layer to itself. If your bag design includes a resealable zipper15 or a gusseted bottom16, separate stations on the machine feed these components in and seal them into place. Finally, a blade cuts the individual bag from the roll. All of this happens in a fraction of a second, with modern machines producing hundreds of bags per minute. This is why strict quality control—checking seal strength, zipper function, and cut accuracy17—is vital during the run.
Conclusion
Understanding the bag manufacturing process empowers you as a buyer. It transforms you from a price shopper into a knowledgeable partner who can ensure quality, compliance, and brand integrity18.
Explore the detailed manufacturing processes of plastic bags to understand quality and supplier selection. ↩
Learn about the multi-step process to ensure you choose a supplier that meets your quality standards. ↩
Discover how blowing raw resin impacts the quality and characteristics of plastic bags. ↩
Understand how laminating enhances the performance of plastic bags for food preservation. ↩
Understand the significance of quality control to avoid costly mistakes in your orders. ↩
Gain insights into the film blowing stage to ensure your bags have the right strength and thickness. ↩
Learn about the importance of resin pellets in creating high-quality plastic bags. ↩
Explore Flexography to understand its advantages for your brand's printing needs. ↩
Discover the benefits of Rotogravure for high-quality, large-volume printing. ↩
Learn about the role of oxygen barriers in maintaining food freshness and quality. ↩
Explore the features of high-performance packaging to ensure your products are well-protected. ↩
Discover the automation involved in bag-making to ensure efficiency and precision. ↩
Learn about heat-seals to understand how they contribute to the integrity of your bags. ↩
Learn how registration marks ensure accurate printing and cutting in bag production. ↩
Explore the benefits of resealable zippers for convenience and product freshness. ↩
Understand the advantages of gusseted bottoms for maximizing storage and usability. ↩
Discover the importance of cut accuracy to maintain the quality and appearance of your bags. ↩
Explore how knowledge of manufacturing processes can enhance your brand's reputation. ↩